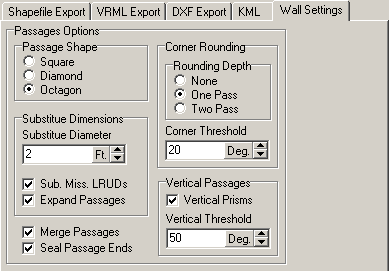
Options. There are several options for how the passages will be rendered in the exported. More complicated passage models produce more realistic passage models, but the file size can be much bigger and this may slow down the target program where the data will be used. To access the Passage Model settings, select the "Wall Settings" tab.
A. Passage Shape. This option allows you to control the cross section shape of the passages. The Square options constructs square passage shapes. The Diamond option constructs diamond shaped passages. The Octagon option constructs eight sided passage shapes. The octagon shape produces smoother more realistic passage models, but there are also twice as many faces. |
|
B. Corner Rounding. Corner Rounding works by subdividing the passage at passage corners. By adding extra segments at the corners, the program produces a smoother, more natural appearance to the corner. There are two Corner Rounding options:
1. Rounding Depth. This option controls the amount of corner rounding that is applied. If the option is set to "One Pass", the program adds one short segment of passage to round the corner. If the option is set to "Two Pass", the program adds three short segments of passage to round the corner.
2. Corner Angle Threshold. Corner Rounding is only necessary when the corner is sharp. Without corner rounding, sharp corners look unnatural. On the other hand, if the corner isn't too sharp, the program can just connect the passages and the corner will look completely natural. The Corner Angle Threshold is used to determine the threshold at which the program will begin rounding. For example, if the angle is set to 20 degrees, only corners that turn more than 20 degrees will be rounded.
C. Substitute Dimensions. In many instances, survey data will be missing the Left, Right, Up and Down measurements (LRUDs) that defines the size of the passage. Without these dimensions, the program will be unable to construction a passage model and there will be blank spots in the cave image. For this reason, Export3D allows you to substitute other dimensions for the missing measurements. Here is a description of the options:
1. Expand Passages. This option handles the situation where a passage dimension is missing because there is a side passage intersecting the main trend. Surveyors normal mark this down as “Passage” and omit any measurement. If the “Expand Passages” option is enabled, the program will look at the surrounding LRUDs to find the nearest valid value. This value is then substituted for the missing information.
2. Substitute Missing LRUDs. This option handles the situation where all the LRUDs are missing from a survey. This makes it impossible for the program to find a substitute LRUD nearby. When the “Substitute Missing LRUDs” the program substitutes a default dimension for each missing measurement.
3. Substitute Diameter. This option set the default to be used when LRUDs are missing.
D. Vertical Passages. When a passage is near vertical, the normal Left, Right, Up and Down dimensions cease to have meaning. For example, in a vertical shaft, the Up measurement would be the entire vertical extent of the pit. As a result, cave programs can have problems displaying vertical passages. For this reason, Export3D has options that allow it to deal with vertical passages differently. Here is a description of the options:
1. Vertical Prisms. When this option is enabled, Export3D treats the Left, Right, Up and Down measurements as West, East, North and South respectively. This creates a much more realistic passage model.
2. Vertical Threshold. This option sets the angle at which the program treats a passage as vertical. Usually this value will be something greater than 45 degrees. As the inclination of a passage exceeds 45 degrees, the passage shape distorts and so it is necessary to treat the LRUDs as East, West, North and South.
E. Merge Ends. This option only applies to the flat Passage option. When this option is enabled, the end of each passage outline is merged with next. This gives the cave a smoother appearance.