Cave Options Page. This page contains items that allow you control the appearance of the cave. Here is a detailed description of each item:
1. Color By Depth. Enabling this option causes the cave to be color by depth. The deepest part of the cave is colored Blues and Purples. The highest parts of the cave are colored Reds and Yellows.
2. Rock Texture. Enabling this option textures the cave with a real photograph of limestone rock. This makes the cave look more natural.
3. Show Passage Walls. This is the default setting and when it is enabled, the programs shows the passage walls as reconstructed from the Up, Down, Right and Left survey measurements.
|
|
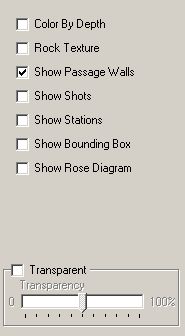
4. Show Shots. When this option is enabled, the program displays the shots lines. If you have the "Show Passage Walls" enabled, you may not be able to see the lines because they will be inside the passages. You can make the passage walls transparent to view the station markers. (See below.)
5. Show Stations. When this option is enabled, the program displays the locations of stations as small cubes. If you have the "Show Passage Walls" enabled, you may not be able to see the stations because they will be inside the passages. You can make the passage walls transparent to view the station markers. (See below.)
6. Show Bounding Box. When this option is enabled, the program displays the smallest rectangular box that completely encloses the cave.
7. Show Rose Diagram. If you have created a "Rose Diagram" for the cave, enabling this option will hide the cave and display the rose diagram.
8. Transparent. Enabling this option makes the passage walls transparent so you can see the shots and station markers inside the passages. You can also adjust the degree of transparency by moving the "Slider" right and left.