In the following sections, we walk through the process of locating blunders with some real-world cave data.
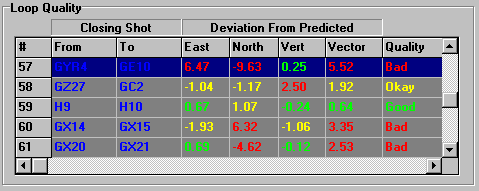
1. Locating Bad Loops. The first image shows loops in Groaning Cave and we have selected a loop with a relatively large error of more than five standard deviations from the prediction. Once the loop is highlighted, we press the “Analyze Loop” button.
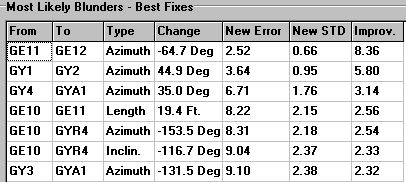
2. Blunder Candidates. The display will now shift to the second page and we will see a list of the best blunder candidates. You will notice that the majority of the best candidates show up as azimuth errors. Also, the first three candidates improve the standard deviation to less than two. Now the task is to ascertain which measurement is actually blundered.

3. Analyzing Intersects. The final step is to select the “Multi-Loop Intersect” page. You will notice that the second and third items in the example appear in five other loops and appear to be blundered in four of those loops. Those four blunders also show up as azimuth errors, which matches the majority of our blunder candidates. Finally, the shot GY1 to GY2 has an adjustment very close to 45 degrees which is the kind of error you might see from misreading certain compasses.