Fixed Stations and Links can only be entered into a "Project" file. In other words, you must have a project before you can enter any fixed stations. The advantage of this is that since Compass can have more than one Project for the same data, you can have more than one set of geographic reference points for a particular cave. For example, you could have one Project where the cave is tied to a local reference and another where it is tied to UTM.
The Linked/ Fixed Station Page. To enter or edit links/fixed stations, open the File Property Editor and select the second page. The following window will appear:
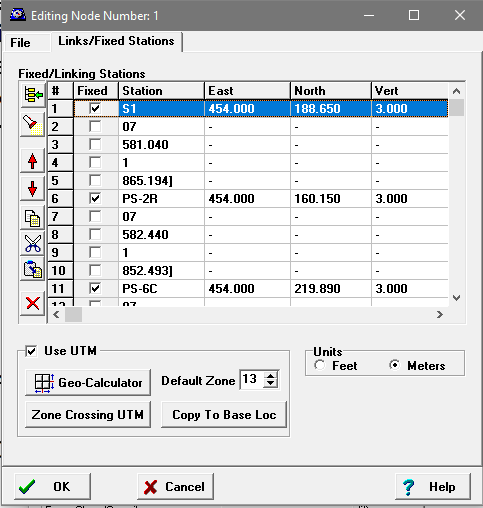
The page is divided into several sections. Here is a detailed description of each section:
I. Fixed/Link Station List. This list allows you to enter or edit Links or Fixed stations for the project file. Each row in the list contains one Link or Fixed station.
A. Columns. Each column contains the actual data. Here is a description of each column.
Fixed. This column indicates whether the items is a Fixed Station or Link. If the box is checked, it is a Fixed Station and East, North and Vertical columns will be enabled. If it is unchecked, it is a Link and the East, North and Vertical columns will be disable because links don't use coordinates.
Station. This is the station name of the Fixed Station or Link.
East, North and Vertical. These are the coordinates for the fixed station. If you are using local coordinates, the values will be the East, North and Vertical distance to the local reference point. If you are using world coordinates, these values will be UTM values. To enter Longitude and Latitude use the Geo-calculator described below.
B. Entering and Editing. To insert a new item in the list, use the Insert button on the tool bar button described below. Once you have one or more rows in the list, you can enter new data or edit preexisting values.
1. Editing Modes. The list cycles through three edit modes.
i. Row Select. When you first click on a row, the whole row be highlighted, indicating that the whole row is selected.
ii. Cell Select. If you click on the row again, the cell under the mouse is selected. Once a cell has been selected, you can begin typing and the data in the cell will be over written.
iii. Edit Mode. If you click a third time, cell enters "editing mode" and you can move the cursor around inside the cell and type or delete characters.
2. Keyboard Commands. You can also change editing modes and perform other editing operations with the keyboard.
Space. If a cell in the "Fixed" column is selected, pressing the Space Bar, with toggle the checkbox on and off.
Escape. If you enter a new value or change an existing value, hitting Escape will undo the changes and restore the original value.
F2. If the list is in Cell Select mode, the list will change to Edit Mode and you will be able to move the cursor around and insert or delete characters.
Control-C: If the List is in Row Select Mode, all four values will be copied to the clipboard (Tab-separated). If the List is in Cell Select mode, the text for that cell will be copied to the clipboard. If you are in the Edit Mode, any highlighted text within the cell will be copied to the clipboard.
Control-X: If the List is in Row Select Mode, all four values will be copied to the clipboard (Tab-separated) and the entire row will be deleted. If the List is in Cell Select mode, the text for that cell will be copied to the clipboard and the content of the cell will be deleted. If you are in the Edit Mode, any highlighted text within the cell will be copied to the clipboard and deleted.
Control-V: If the List is in Row Select Mode and the clipboard contains the four values copied using the Control-C or Copy Button, the value will inserted before the currently selected row. If the List is in Cell Select mode, the contents of the clipboard will overwrite the contents of the selected cell. If you are in the Edit Mode, the will inserted at the cursor and any highlighted text will be overwritten.
Enter. If the List is in Row Select Mode, the list will switch to Cell Select mode on the Station Name field. If the list is already in Cell Select mode, the selected cell will move one cell to the right. If selected cell is on the last cell in the row, the selection will move to the next row and switch to Row Select mode.
Tab: If the List is in Row Select Mode, the Windows' focus will move away from the list to other controls on the page. If the list is in Cell Select mode, the selected cell will move one cell to the right. If selected cell is on the last cell in the row, the selection will move to the next row and switch to Row Select mode
Delete. If the List is Row Select Mode, the whole line will be deleted. If the List is in Cell Select mode, the selected cell will be cleared. If the list is in Edit Mode, the character to the right of the cursor will be deleted.
Backspace If the List is Row Select Mode, nothing will happen. If the List is in Cell Select mode, the selected cell will be cleared. If the list is in Edit Mode, the character to the left of the cursor will be deleted.
Arrow Keys. The Arrow Keys have different effects depending on which mode they are in.
|
Row Select |
Cell Select |
Edit Mode |
Up Arrow |
Previous Row |
Previous Row |
Previous Row |
Down Arrow |
Next Row |
Next Row |
Next Row |
Left Arrow |
Previous Row |
Previous Cell |
Previous Character |
Right Arrow. |
Next Row |
Next Cell |
Next Character |
3. The Tools Bar Buttons. The Tool Bar sits to the left of the grid. It contains a several buttons that allow you to manipulate the list of links or fixed stations. Here is a description of the buttons.
![]() Insert Button. The Insert Button allows you to insert an new row in the Grid at the end of the list.
Insert Button. The Insert Button allows you to insert an new row in the Grid at the end of the list.
![]() Search Button. This button allows you to search through the list of Link/Fixed Stations. The search is case insensitive and you can search up and down through the list. You can use a question mark "?" as a wild-card character to match any character in the string.
Search Button. This button allows you to search through the list of Link/Fixed Stations. The search is case insensitive and you can search up and down through the list. You can use a question mark "?" as a wild-card character to match any character in the string.
![]() Delete Button. If the List is Row Select Mode, the whole line will be deleted. If the List is in Cell Select mode, the selected cell will be cleared. If the list is in Edit Mode, the character to the right of the cursor will be deleted.
Delete Button. If the List is Row Select Mode, the whole line will be deleted. If the List is in Cell Select mode, the selected cell will be cleared. If the list is in Edit Mode, the character to the right of the cursor will be deleted.
![]() Copy Button. If the List is in Row Select Mode, all four values will be copied to the clipboard (Tab-separated). If the List is in Cell Select mode, the text for that cell will be copied to the clipboard. If you are in the Edit Mode, any highlighted text within the cell will be copied to the clipboard.
Copy Button. If the List is in Row Select Mode, all four values will be copied to the clipboard (Tab-separated). If the List is in Cell Select mode, the text for that cell will be copied to the clipboard. If you are in the Edit Mode, any highlighted text within the cell will be copied to the clipboard.
![]() Cut Button.: If the List is in Row Select Mode, all four values will be copied to the clipboard (Tab-separated) and the entire row will be deleted. If the List is in Cell Select mode, the text for that cell will be copied to the clipboard and the content of the cell will be deleted. If you are in the Edit Mode, any highlighted text within the cell will be copied to the clipboard and deleted.
Cut Button.: If the List is in Row Select Mode, all four values will be copied to the clipboard (Tab-separated) and the entire row will be deleted. If the List is in Cell Select mode, the text for that cell will be copied to the clipboard and the content of the cell will be deleted. If you are in the Edit Mode, any highlighted text within the cell will be copied to the clipboard and deleted.
![]() Paste Button. If the List is in Row Select Mode and the clipboard contains the four values copied using the Copy Button or Control-C command , the value will inserted before the currently selected row. If the List is in Cell Select mode, the contents of the clipboard will overwrite the contents of the selected cell. If you are in the Edit Mode, the will inserted at the cursor and any highlighted text will be overwritten
Paste Button. If the List is in Row Select Mode and the clipboard contains the four values copied using the Copy Button or Control-C command , the value will inserted before the currently selected row. If the List is in Cell Select mode, the contents of the clipboard will overwrite the contents of the selected cell. If you are in the Edit Mode, the will inserted at the cursor and any highlighted text will be overwritten
![]()
![]() Up/Down Arrows. These buttons move the selected links up or down one row.
Up/Down Arrows. These buttons move the selected links up or down one row.
3. Use UTM Coordinate Box. The values you enter can be tied to any coordinate system you like. If you want to use UTM or Longitude/Latitude coordinates, you have to enable the Use UTM option. Once it is enabled, you have several options:
A. Geo-Calculator Button. Pressing this button takes the currently selected value from the list and sends you to the Geo-Calculator. The Geo-Calculator allows you to enter UTM or Longitude/Latitude coordinates. There are also tools to help you verify the location and calculate other values such as Declination and Convergence.
B. Default UTM Zone. Compass uses one UTM zone as the base or default zone. Once the default zone has been set, it is used for all fixed stations, station locations and data exported to GIS programs. If a fixed point falls outside the default zone, Compass can convert the position a new coordinate inside the base zone.
C. Zone Crossing UTM Button. If you want to enter a fixed station that is outside the default zone, you
you have to convert it to the equivalent position in the default zone. Pressing the Zone Crossing UTM Button will allow you to make the conversion.
D. Copy To Base Loc Button. Compass can automatically calculate Declinations based on the general location of the cave and the date a survey was taken. This general location is normally entered in the Project Settings dialog. Pressing this button copies the currently selected fixed station location to the base location, saving some mouse clicks and some work.
4. Units. The value you enter can be in either feet or meters. The Units box indicates which units you are using. If the Convert Units checkbox enabled, changing the Units setting will convert the all the entries in the Grid to the newly selected units. If it is disabled, the you can change the units and the numbers in the Grid will stay the same values.