|
II. Creating A New Map. The process of creating a new map is different
from the process of updating an existing map. The following steps will walk you
through the process.
A. Exporting An SVG File. The first step in the process of creating a
new cave map is to process the cave as you normally would in Compass. If there
are loops in the cave and you probably want to close the cave so there are
anomalies in the cave plot. Processing the cave will produce a "Plot" file with
the extension "PLT". This file will for the basis of your exported file.
After the file has been processed, run the SVG Exporter and load
the particular PLT file that you have just created. Click here:
for a detailed tutorial on using the SVG
Exporter here.
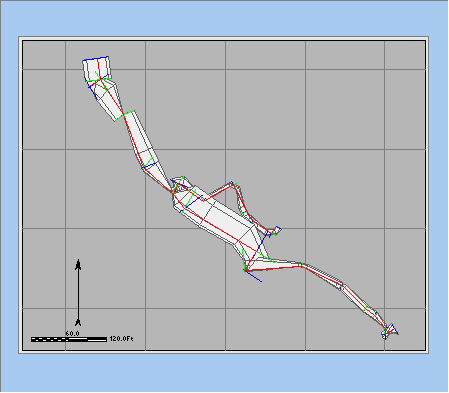
| After you have loaded the PLT file, an
image of the cave will appear in the center of the window.
The gray portion of the image shows the paper size and
margin. The cave passages, plot lines, and everything else in the
display shows an exact image of what will be exported in the SVG file.
At this point you should adjust position, size and rotation of the cave
so it will work with the cave map you are planning to draw.
The
details of all the options are beyond the scope of this tutorial, but
you can click here for a complete
tutorial. They are also described in detail in the SVG Export Tool's help files. |
|
|
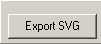
Once you are satisfied with the appearance of the map, export it to an SVG File
by clicking on the "Export SVG" button just above the map display |
|
|
B. Run Inkscape. If you have Inkscape installed, you should be able to
double-click on the SVG file and Inkscape will load the file and display it. The
result should look something like this:
|
|
|
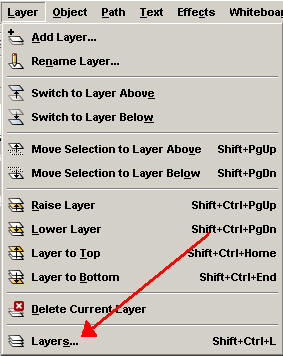
| C. Open the Layers Panel.
An SVG drawing is organized into layers. The layers are very important
to the map creation process and we will be working with them all through
this tutorial. For this reason, we are going to start with a brief
tutorial on layers
To view the available layers in a drawing, choose the
"Layer -> Layers" options from the menu bar:
1. The Layers Panel. The
Layers Panel will appear on the right side of the screen.
When you first display the panel, the layers will be
confined to a small window at the top of the panel. It only allows you
to see two layers, so you will need to expand the window. |
|
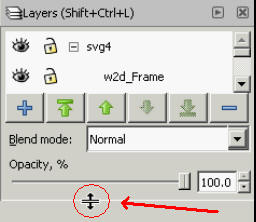
| You can expand the window by
dragging the "divider" that is barely visible just below the "opacity"
control. Just move your mouse over the divider and the cursor will change
as shown
in the image to the right. Now hold down the mouse button and drag
downward. The panel will expand revealing the full list of layers. |
 |
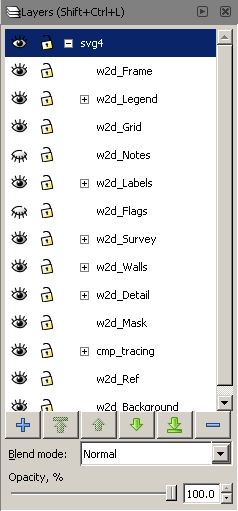
| The panel should now look something like the image
to the right. If you don't see all the layers, click the [+] plus sign
to the left of the "svg4" layer and the full list will expand.
2. Organization.
Layers are used to organize a drawing. Each layer can contain one or
more elements of the drawing. This allows you to group common objects in
the same layer. For example, you could put all the passage walls on the
same layer.
3. Control. The layers are also used to control which parts of the
drawing are visible and accessible during the drawing process. You can
hide layers and make them invisible.
4. Lock. You can also lock and unlock layers. When
a layer locked, you cannot select it or change it in any way. It is
useful to lock certain layers while you are working so they cannot be
accidently disturbed, moved or changed.
3. Predefined Layers.
Finally, Compass makes special use of the layers. When the Exporter generates
an SVG file, it creates a set of pre-defined layers. |
 |
|
Each predefined layer has a specific function. Some
layers are empty and you can put anything you want in them. In other
layers, the SVG Exporter deletes and replaces all the content, so you
should never put any drawings or object in those layers. Finally, some
layers are manipulated and adjusted by the exporter to track changes in
that have occurred in the cave data.
Because each layer has a different purpose and is
treated differently, it is important that you understand the functioning
of the layers before you begin drawing you your cave map. In order for
the layers to be adjusted properly and not deleted be delete by the
exporter when it updates your data, it is important your drawings are
placed in the correct layers. Click here for a
detailed description of the layer
system. |
4. Controlling Layers. There are several
tools in Inkscape that allow you to
control the Layers in Inkscape.
| The first tools is the
Visibility Control. It is represented by a small "eye symbol" to
the left of the layer. If the eye is open, the layer is visible. If the
eye is closed, the layer is hidden. To change a layer from
visible to invisible or vise versa, simply click on the eye. |
 |
 |
| The second tool is the Lock
Control. It controls whether the items on the layer can be
selected or modified. It represented by the small "padlock" to
the left of the Layer. If the padlock is locked, the layer is
locked. To lock or unlock the layer, simply click on the
padlock. |
 |
 |
5. Layer Hierarchy. Layers are hierarchical. That means you
can have layers inside other layers. This gives you more precise control
over particular parts of your drawing. For example, locking the
top layer will lock all sub layers, while locking a bottom layer only
locks that specific layer. This allows you lock large sections of the
drawing all at once, while still being able to control specific
sub-categories.
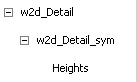
| If you see a plus sign [+] next to a layer,
it indicates that there are sub-layers underneath that layer. To
view those sub layers, click the [+] sign. It will change to a
[-] sign and all the sub-layers will be displayed. Likewise,
clicking on a [-] symbol will collapse the sub-layers so you
only see the top layer. |
|
|
|

