|
COMPASS For
Windows |
|
|
|
Getting COMPASS
|
|
|
|
Download/Install Issues
|
|
|
|
Registration
Information |
|
|
|
Auxiliary Tools/Information |
|
|
|
Tutorials - (New) |
|
|
| Links |
|
|
|
Documents/White Papers |
|
|
|
COMPASS For DOS |
|
|
|
MISC. |
|
|
|
|
|
|
|
|
|
|
Tracing The
Sketch-map |
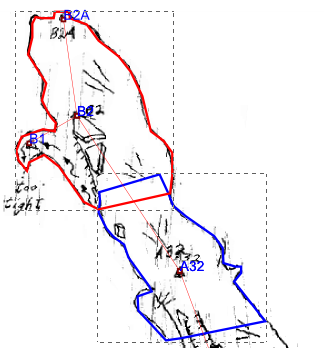
V. Tracing The Sketch-map. At this point, we are going to
start tracing the outline of the cave passages from the sketch-map.
| A. Select the Drawing Layer.
We want to put our
hand-drawn passage outlines in the "w2d_Walls" under the "w2d_walls_shp"
sub-layer. (This layer can be warped and adjusted to reflect future changes in the
positions of survey stations.) To do this, expand the "w2d_Walls"
layer and
highlight the "w2d_walls_shp" sub-layer. |
 |
| B. Zoom Into The Start of the Survey.
We want to
zoom in on the drawing to make it easier to draw the passage outlines.
We do this by selecting the "Zoom Tool" on the left side of the window.
When the Tool is enabled, each click on the drawing zooms and centers
the image on that point. We want to zoom in so we can see two or three
shots near the beginning of our survey, so click a few times near that
point where you are going to start..
|
 |
| C. Select The Bezier Tool.
The passage walls need to be smooth lines, so we will use the Bezier
Tool that
can be found on the on the Tool Bar on the left side of the screen. Click on the tool once so
the button goes down. |
 |
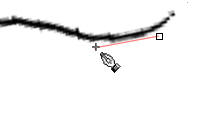
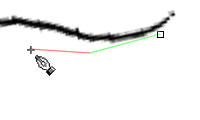
| D. Trace A Passage Segment.
We are going to draw a passage outline by clicking a series of points
along the walls in your sketch map. Choose a starting point and
click once. Now move the mouse along the edge of the passage. As you do this,
a red line will stretch and follow the cursor. After moving the cursor a
short distance, click again. This will turn the original line green and
place a new starting point for the red line. Every time you click a new
point will be placed. These points and line will form the basis of passage
tracing. |
|
|
|
|
Number Of Points. You want to strike a happy medium between
having too many points and too few points. Having too many points means
more work later; having too few means may have to add more later.
Basically, you should click every time the passage wall changes
direction. The more curves in the passage walls, the more often you
should click. For
circular curves, you may need to click three or four times to go around
the turn. Don't worry if the line doesn't follow the passage wall
perfectly; we will be able to make adjustments later.
Short Segments. Keep making points
along the passage wall until you have covered two or three shots, then
cross over the passage and start working you way back the starting
point. Basically, you don't want to outline the
whole cave at once. We will be combining small passage segments into a
continuous passage outline later. If you run into the edge of the
window, you can reach the scrollbars with the mouse and scroll more of
the passage onto the screen. |
|
Open Branches. Also, you should trace over the open passage branches, so the whole
segment is completely encircled. We will open the branches and the
entrance in a later step. |
|
|
When you have gone all
the way around your passage segment, you will see a small square box
where you started. For the final line, click in the center of the box.
This will close the outline and draw the heavy line that forms the
outline. Don't worry that the lines look square and boxy; we will smooth
and make the look more cave-like later. E. Set Fill, Line Size and Line Color. Once the
line is drawn, you can set its fill color, line thickness and line
color. On the menu bar select the "Object -> Fill and Stroke"
option. This will put a new set of options in the right-hand panel. |
 |
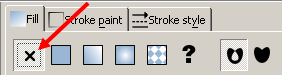
| Fill. Start by selecting the "Fill" page.
If the
area you have enclosed is filled with color, this option will allow you
to remove it. To remove the filled background of your outlines, press
the [X] button on the far left. |
|
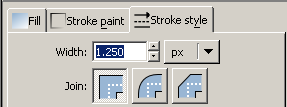
| Thickness. Next, we will set the
line thickness. Select "Stroke Style page and enter a value in
the Width box. I'm using 1.25 pixels for this example. You may want to
choose a heavier or thinner line depending on the size of your map. Whatever you
choose, it is easy to change at any time later. |
|
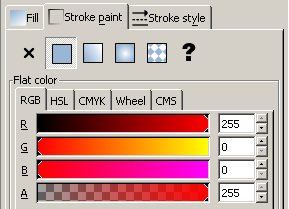
| Color. Finally, select the "Stroke Paint" page and choose a
color. First, make sure the "Flat Paint" button is pushed. Next, use one
of the color selection tools to pick a color. Since the lines in the
sketch-map are likely to be black, it is useful to choose a contrasting
color like red to make it easier to see. (We will change it back to
black later on.) |
|
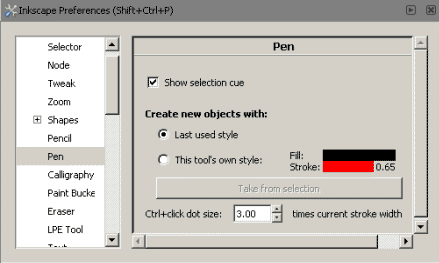
| Defaults. Since we will be using the
same thickness and color throughout this part of the process, it is
useful to use these settings as the default. To do this, select the
"File -> Inkscape Preferences" option from the menu bar.
On the left panel, select the "Pen" option.
In the right panel, select the "Last Style Used" option. This will cause
the Inkscape to use the last color, thickness and fill you set as
the default for every new line you draw. |
 |
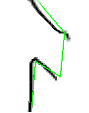
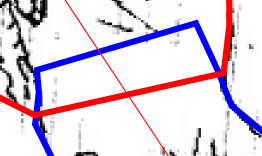
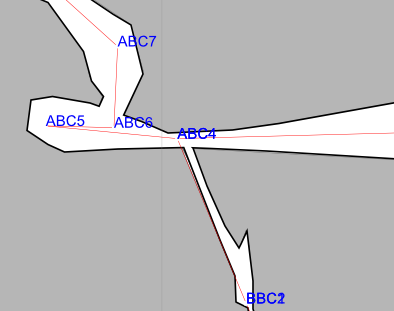
| F. Trace The Next Segment. Now carry out the same
procedure on the next passage segment so you have two passage outlines.
Make sure that as you do this that the ends of your two passage segments
overlap as shown in the image to the right. If they aren't overlapped,
we won't be able to merge them. The merging process will only take place
in the areas that are overlapped, so if you want the width of the
passage to be merged, the whole width of the two passages must overlap.
If the passages don't overlap the way you want, you
can use the Node Adjust tool (described below) to move the points on the
line into the proper position so they overlap. |
|
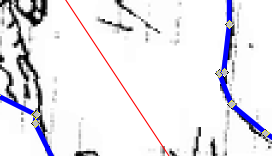
| G. Merge The Two Segments.
We will now combine
the two segments into a single outline. Select the Node Tool by clicking
on the corresponding button on the left tool bar.. When this option is
enabled, you can select and manipulate points in our outlines. |
 |
| Select the first outline by carefully clicking on the
line. You will know if you have select the outline when a dotted
box appears around the outline. Be careful to only click on the line;
the tools can be used to select any part of the drawing, but we only
want to select the outline. You may want to zoom in a bit to get a
better view. You can also lock or temporarily turn off some of the other
layers to make the selection process easier. |
Once you have select the
first outline, hold down the "Shift Key" and click on the second
outline. You now should have two dotted boxes, one around each outline.
From the menu bar, select the "Path -> Union" option.
This will combine the two outlines into a single outline.
Everywhere that the outlines overlapped, the intersecting lines will be
replaced by open passage.
Continue this process drawing overlapping outlines and
merging them until all the passages
in your map have been outlined. I find that this technique of
outlining small segments and combining them works very well for even for
large and complicated passages. Where the is a lot of detail, you can
use small segments and were the passage is simple and long you can use
large segments. Note: you may notice that the
line thickness gradually decreases as you work. I think this a bug in
Inkscape, but it is easy to get around by increasing the lines size back
1.25 pixels as described in number E above.) |
 |
|
 |
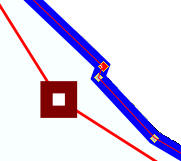
| (Extra Points. When you merge two
passage outlines, you may get a few extra points along the passage
lines right at the intersection. If you want, you can delete them as you
go or delete them later while we are smoothing passage. To delete a
point, simply click on it so it is red and highlighted and then hit the
"Delete"key. |
|
|
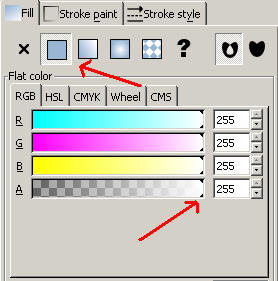
H. Fill The Outline. You can now
fill the outline so it is easier to see and work with in later steps. To
do this, make sure the outline is selected and go to the "Object -> Fill and Stroke" option on the menu
bar. The "Fill and Stroke" tool will appear on the right-hand panel.
Select the "Fill Page" and press the "Fill" button. This will fill
the outline with whatever color is selected, which is often black. You probably want a lighter color, so move all
the sliders in the RGB section to the far right. That will fill your
passage outline with white.
|
|
| Your map should now look something
like the image to the right. The cave will be outlined, but there will
be lots of un-cave-like sharp corners. We'll fix that in the next step. |
 |
| I. Adjusting The Outline. This is
the beginning of the artistic part of the process. You probably want to
have your survey notes and sketches for this part of the process.
First, use the magnifying tool
to zoom in on the part of your map where you want to start working. Now
select the Node Manipulating tool from the left tool bar. |
|
|
|
| When you do this, you will notice that a
bunch of dots will appear where ever the lines change directions. These
dots are called "nodes" and you can drag then to new positions with the
mouse. As you do this, the lines will move with them. In this way, you
can reposition the lines to more closely match the original outlines.
You can also use to more closely match the passage details in your sketches. In this way you gradually refine the passage
outline so it more accurately reflects the position of the passage
walls. |
|
|
If you find that you don't have enough nodes to make the
wall follow the path you want it to, simply double click on the line.
This will add an additional node at the point clicked. Likewise, if you
have too many points in an area, you can select the point and press the
"Delete" key to remove the node. In general, you want to
add as many nodes as you need to outline the passage. However, you
generally want to keep the number of nodes to a minimum because the mode
node you have, the more adjustments you have to make and the more time it
will take to finish the map. |
| J. Smoothing The Outline. The nodes
can also be used for smoothing the sharp corners and making the passage
walls undulate like a well-drawn cave map. The technical name for
capability is a "Bezier Curve." To use the curve, click on the line
between the nodes and drag it in the direction you want the passage wall
to curve. The line will begin bowing in the direction you drag it. This
is the easiest way to change the shape of the passage lines, since you
can drag them in any direction. |
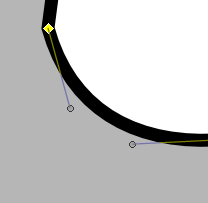 |
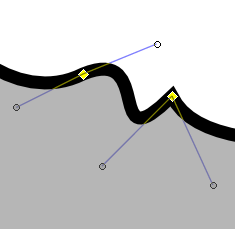
| While you are bowing the passage
lines, you will notice that additional thin lines with circles on the ends will emerge from the
nodes. These are called "Control Points" and each node can have two of
them, one for each line that comes into the node.
The control points control the shape of the line coming
out of the node. They allow you to smoothly bend the lines in various ways. If you
drag the points in any direction, the main line will bow to follow the
control point. The longer the control line is, the more bowing you will
have.
|
 |
|
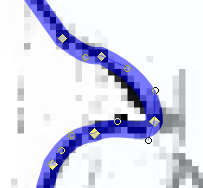
The image above shows how the control points affect the shape
of the line. On the left-most node, the two control lines are equal
lengths and 180 degrees apart. This makes a very smooth line on either
side of the node.On the other hand, the right-most node has control
lines that 90 degrees apart. As you can see, this make the lines form a
sharp angle. By varying the angles and lengths
of the control lines, you can create virtually any passage wall shape
you need. Inkscape has several tools that help you manipulate the
control points using the Control, Shift and Alt Keys.
Shift-Key. If you hold down the Shift-Key while dragging a control point,
Inkscape maintains the angle between the two controls lines. For
example, if the lines were 45 degrees apart, holding down the Shift Key
would maintain that angle no matter where you drag the control point.
Alt-Key. If you hold down the Alt-Key while
dragging a control point, Inkscape will maintain the length of the
control line but not the angle.
Control-Key. If you hold down the Control-key
while dragging a control point, Inkscape will snap the angles to even 15
-degree multiples.
Using these tools allows you create smooth clean lines of almost any
shape. This is perfect to creating clean, smooth passage wall lines. It
takes some practice to learn to use the control points, but with
practice, you can rapidly generate very pleasing passage wall outlines.
A complete description of all the things you can do with Bezier curves
is beyond the scope of this tutorial, but you can find plenty of
information on the internet by searching for "Inkscape Bezier Tool."
|
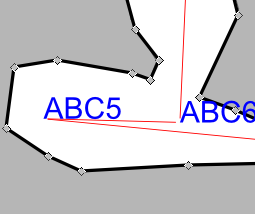
| Minimizing Points. It is often useful to delete
points around curves. In many instances it actually makes the curves
smoother and more accurate. It also reduces the amount of work you have
to do if there are less points to adjust. |
|
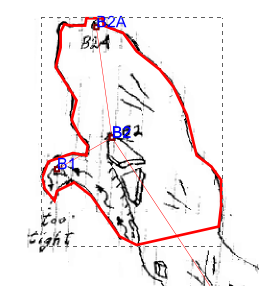
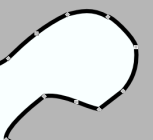
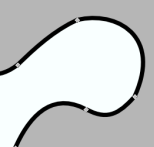
| The image to the right shows a curve from the B-Survey
of Fulford. In the first image, there are nine points around the edge. The next image shows
the same curve with only four points. The curve is actually smoother and
was much easier to adjust. The key was using "control points"
affectively. |
|
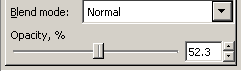
| K. Opacity.
Since you want to make sure your lines
track the sketch-map, it may be useful to make the line
partially transparent from time to time to check the position.
Transparency is set using the "Opacity" slider at the bottom of
the Layer List. |
|
|
|
|
|
|
|
|
|
|
| Sponsored Links |
|
|
| Sponsored Links |
|
|
| Sponsored
Links |
|
|
| Sponsored Links |
|
|
|

