Tilting Color-By-Depth and Depth Clipping
The Viewer has the ability to tilt the Color By Depth and Depth Exclusion
options. This makes it possible to color or clip specific levels in a cave
that has been tilted. The tilt can be set by specifying the azimuth and
inclination of the tilt. It can also be set visually by dragging the arms
of a three-dimensional "compass" into the proper position. The program even
has the capability of analyzing the cave and finding the average dip and
angle of the passages.
Wind Cave Showing Normal Color-By-Depth

Normally, the Color-By-Depth options color according the absolute depth of
the cave. Here is a plot of Wind Cave viewed from the southwest showing the
normal color-by-depth scheme.
Wind Cave Showing A Tilted Color Scheme

Many caves have passage development at specific levels. For example, Wind
Cave is developed on four discrete level. It is often useful to color these
levels, with different colors. However, in many caves, the whole cave is
tilted which makes it difficult to color the levels. For example, Wind Cave
is tilted to the southeast at five degrees. This image shows tilted coloring.
As you can see, the color scheme follows the dip of the cave.
Comparison of Absolute versus Tilted Color Schemes
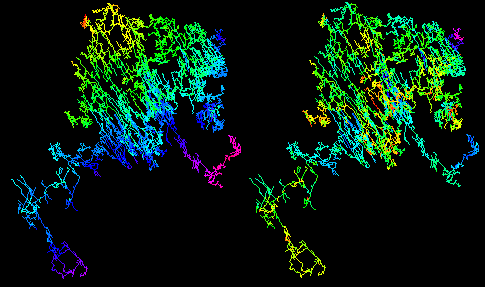
Once you have tilted the color scheme, viewing the cave from above shows
the relative structure of the cave. The image on the left shows Wind Cave
colored by absolute depth. The image on the right uses a tilted color scheme
to show the cave depth relative to the tilted rock formations the contain
the cave. This give you a "stratigraphic" view of the passages. As you can
see, the stratigraphic deep and high points are very different when viewed
this way.
Setting Color-By-Depth and Excultion Tilt Angles.
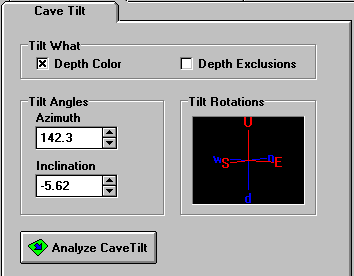
This dialog allows you to set the tilt angle of the Color-By-Depth and Depth
Exclusions. You can set the angles by directly entering the azimuth and
inclination of the tilt. The tilt is visualized by the "compass" on the right
side of the screen. You can also drag the arms of the compass to set the
tilt angle. Finally, the program can analize the cave data and calculate
the angles for you.
|